Shrink
Collapse selected vertices to create a shape that hides part of the clothing.
きせった (Kisetter) 3.4.1 documentationShrink collapses selected vertices toward their bones to hide part of the clothing. Use Save as BlendShape to keep the result as a BlendShape.
[1] Select an area and preview#
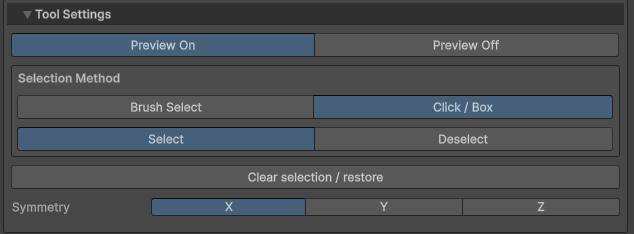
- Under Selection Method, choose Click / Box or Brush Select.
- Use Select to add areas and Deselect to remove them.
- Choose Preview On to inspect the shrink result. Choose Preview Off to adjust the selection on the unshrunk shape without clearing the selection.
- Keep Preview On selected when saving the result.
[2] Selection controls#
| Selection method | Add or remove vertices |
|---|---|
| Click / Box | Click or drag to select; Shift adds and Ctrl removes. |
| Brush Select | In Select mode, drag to add. Use Deselect or Shift-drag to remove. |
Both methods share the same selection. Clear selection / restore clears it and restores the unshrunk shape.
[3] Brush settings#
The Shrink brush selects or deselects vertices to collapse. Brush strength does not control the amount of shrink.
| Option | Description |
|---|---|
| Brush Radius | Set the area selected around the cursor in Brush Select. The radius option is hidden in Click / Box. |
| Select / Deselect | Drag to add an area in Select mode or remove it in Deselect mode. Shift-drag also removes vertices while Select is active. |
| Symmetry | Select or deselect vertices on the opposite X / Y / Z side relative to Root Object. Multiple axes can be enabled together. |
| Input | Action |
|---|---|
| Shift + mouse wheel | Adjust brush radius. |
| Esc | Cancel the current brush stroke. |
Use these shortcuts in the Scene View. On macOS, use Command instead of Ctrl.
Brush Strength, Brush Weight Mode, and Reference Meshes are not used here. Adjust the selection while inspecting the result with Preview On.
[4] Save your edits#
After editing, recalculate weights and realign PhysBones if needed. See saving and mesh separation to save the result as a Mesh or BlendShape.