
Resolve Clothing Clipping
Move clothing that penetrates the reference mesh back outside its surface.
きせった (Kisetter) 3.4.1 documentationResolve Clothing Clipping moves penetrating areas of the Main Mesh outside the reference surface.
[1] How to use it#
- Add body meshes or other suitable surfaces to Reference Meshes.
- Set Surface Gap (mm), radius, and strength.
- Adjust the Scene View to see the affected area and check the brush arrow.
- Drag over the clipping area on the Main Mesh.
[2] Brush settings#
| Option | Description |
|---|---|
| Brush Radius | Set the area around the cursor in which to correct clipping. |
| Brush Strength | Set how strongly the brush moves penetrating clothing outside the reference mesh. Set the desired surface gap separately. |
| Symmetry | Enable X / Y / Z to apply the operation to the opposite side relative to Root Object. Multiple axes can be enabled together. |
| Input | Action |
|---|---|
| Shift + mouse wheel | Adjust brush radius. |
| Ctrl + Shift + mouse wheel | Adjust brush strength. |
| Shift + mouse wheel with Caps Lock on | Adjust brush strength. |
| Esc | Cancel the current brush stroke. |
Use these shortcuts in the Scene View. On macOS, use Command instead of Ctrl.
[3] Reference meshes and surface gap#
Use Reference Meshes to specify the surface against which clipping is corrected. You can use the avatar’s body meshes or other meshes.
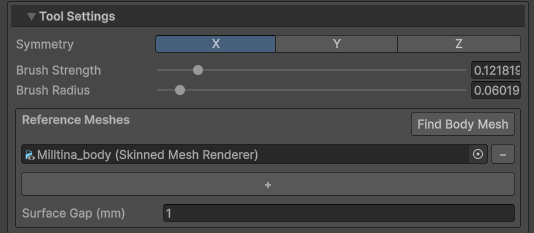
- Check the body mesh automatically found in the clothing’s parent hierarchy.
- Click Find Body Mesh to search again for a body mesh on a Humanoid Avatar in that hierarchy.
- Use + to add a reference and − to remove one. Manually added meshes are retained during automatic discovery.
The Main Mesh itself and renderers sharing its mesh data are excluded from the references.
Surface Gap (mm) sets the clearance between the corrected clothing and the reference surface. Enter 1 for a 1 mm gap.
[4] Check the result#
The tool uses the outer reference surface exposed toward the arrow. Nearby fabric and overlapping layers may follow the correction, so check the surrounding shape as well. Change your viewpoint to work on clipping facing another direction.
[5] Save your edits#
After editing, recalculate weights and realign PhysBones if needed. See saving and mesh separation to save the result as a Mesh or BlendShape.