Preset Guide
Save adjustments for an avatar pair as a preset, then load or edit them for future conversions.
きせった (Kisetter) 3.4.1 documentation⚫ A preset stores BlendShape values, bone adjustments, breast reference positions, and supported fitting options for an avatar pair so you can reuse them.
⚫ Save your frequently used conversion settings as presets and easily load them whenever you need them.
⚫ Found settings that give you great results? Share your presets with other Kisetter users!
⚫ Even when using a preset, you still need the source avatar or a source profile to fit an outfit.
1. Before you begin#
Assign the Source Avatar, Source Clothes Object, and Target Avatar before using presets. If you are using a source profile instead of the source avatar, assign the Profile instead.
If you have not assigned them yet, see 4. きせった (Kisetter) Setup in the Automatic Outfit Fitting Guide.
2. Load a preset#
Click Load in the Preset section.
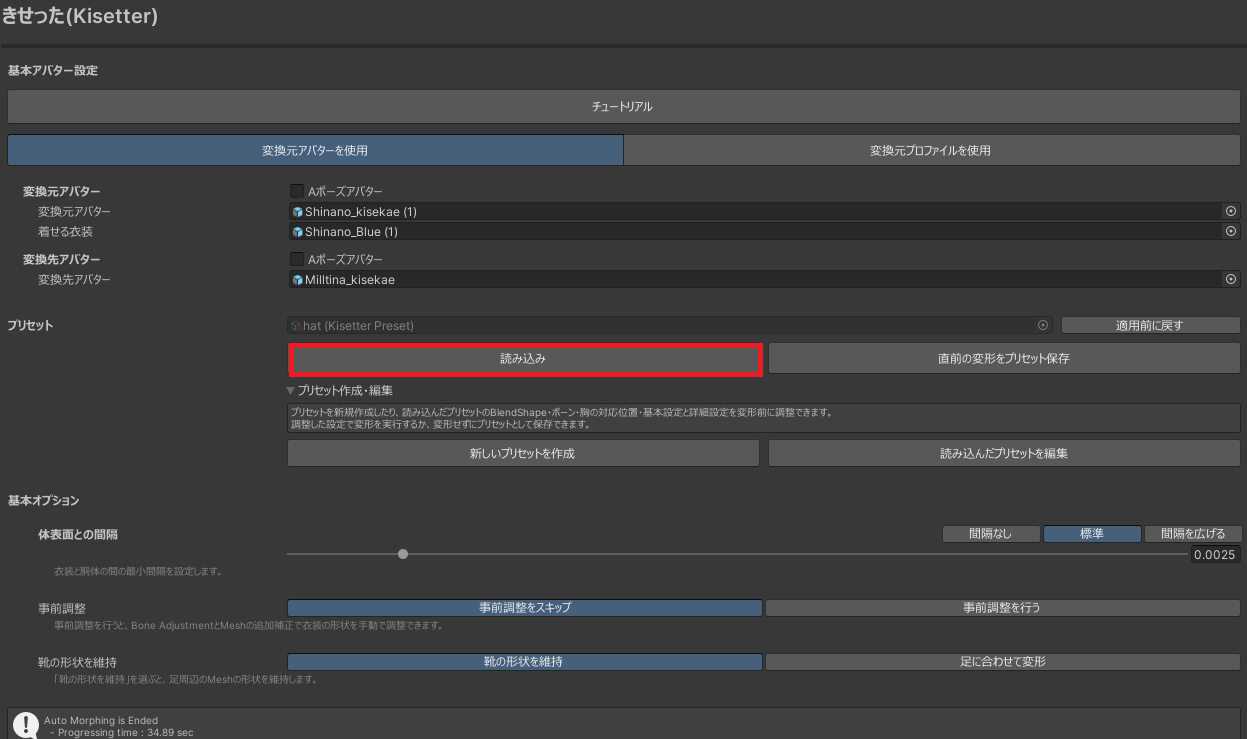
Filter the list by Source Avatar and Target Avatar name.
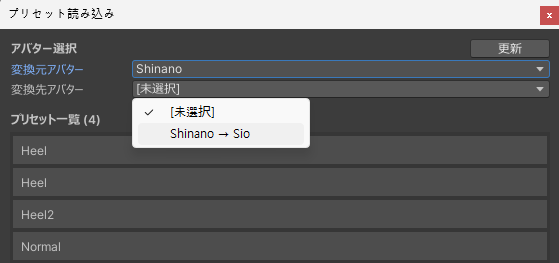
- These names are not predefined. The preset creator enters or edits them when creating or saving a preset.
Select a preset from Presets, then click Apply.
After applying the preset, check that the BlendShape values suit your outfit, then click Dress Avatar to run the conversion. If you need to change the values, use the preset editor.
3. Save the last conversion as a preset#
Use this to save the settings used in the conversion you just completed. Bone and breast matching adjustments made during pre-adjustment are also included in the preset.
This button is only enabled after a conversion is complete. First, finish the full conversion with Dress Avatar. If you are working step by step, complete Weighting as well.
Click Save Last Conversion as Preset in the Preset section.
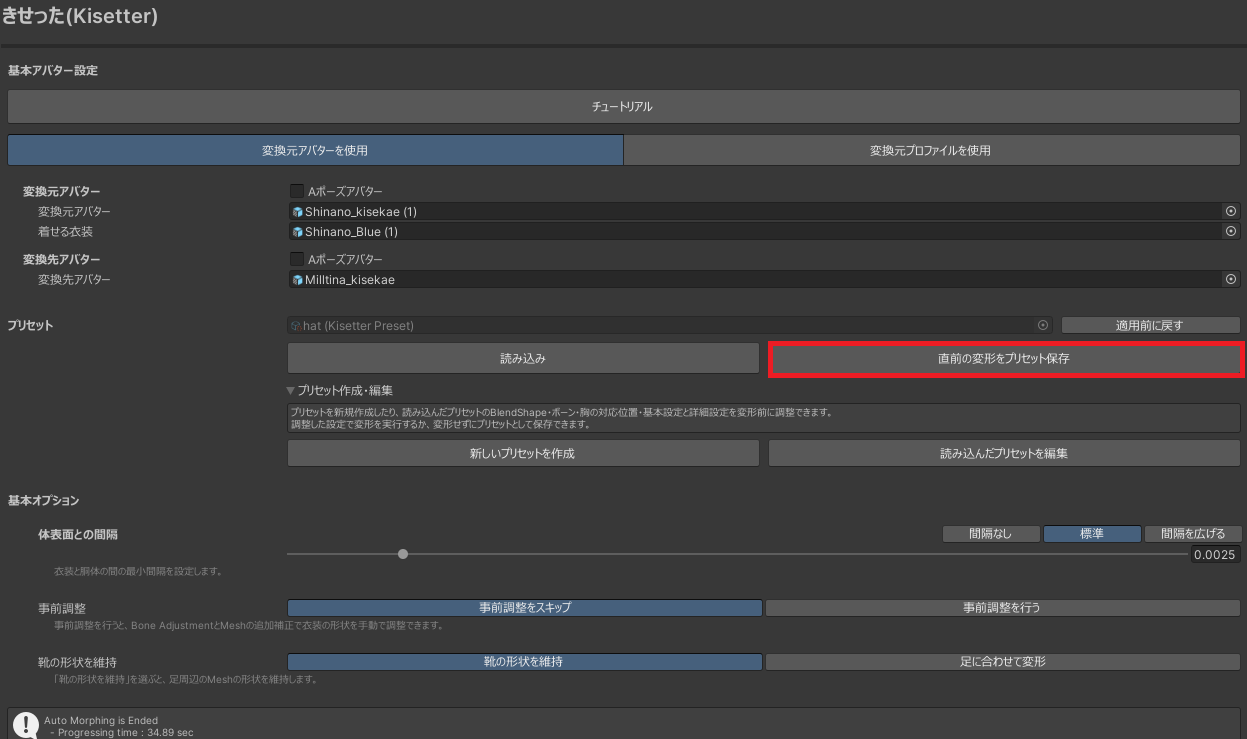
Check the following fields in the save window and edit the names if needed.
Field What to enter Preset Name A name that will help you identify the preset later Source Avatar Name A name that identifies the source avatar Target Avatar Name A name that identifies the target avatar 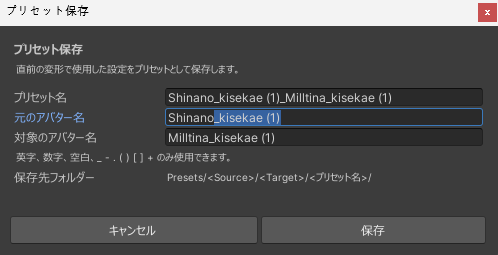
Click Save, then confirm in the confirmation dialog.
When the save completion message appears, the preset has been created and is automatically selected in the Kisetter window.
Preset names and save location#
- Source Avatar Name and Target Avatar Name can contain only English letters, digits, spaces, and
_ - . ( ) [ ] +. These names appear in the avatar lists in the load window. - Do not use characters that are invalid in file names in Preset Name. The name cannot end with a period.
- Presets are saved as
.assetfiles in folders organized by Source / Target / Preset Name, underAssets/@Eden_Tools/Kisetter/Presetsin your Unity project. - If a preset with the same name already exists for the same avatar pair, an overwrite confirmation appears. To keep the existing preset, cancel and save with a different Preset Name.
4. Create a new preset or edit an existing one#
Use this to create a new preset without running a conversion, or to make further changes to a preset you have loaded.
Expand Create / Edit Preset in the Kisetter window and choose the button that matches your goal.
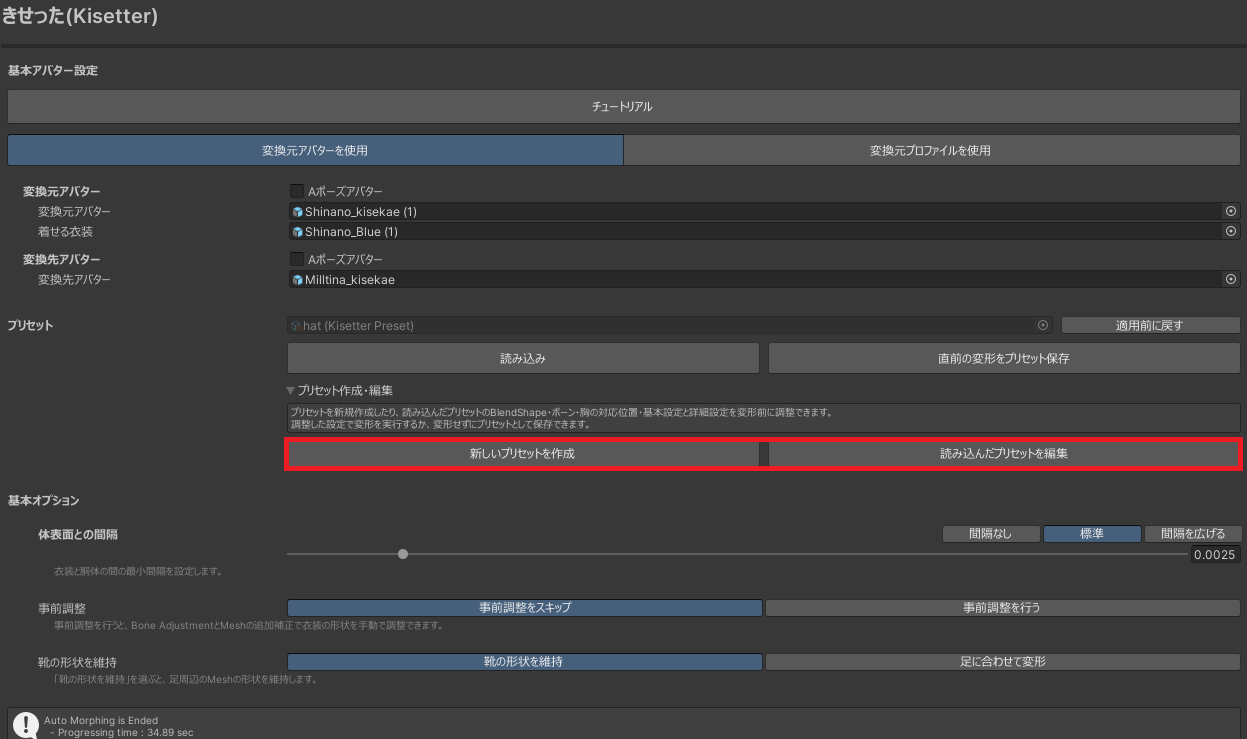
- Create New Preset: Create a new preset for the current avatar pair.
- Edit Loaded Preset: Make further changes to the preset you have loaded.
Adjust the settings you need in the editor.
Tab What you can adjust BlendShape Select Source Avatar or Target Avatar to adjust the BlendShape values of its body mesh. Matching Adjust bone and breast reference positions. Options Adjust Kisetter's basic and advanced fitting options, such as Body Gap and Smooth. Expand the sections below for details on each feature.
Avatar view and visibility settings
Use the controls at the top of the editor to make the avatars and outfits easier to view.

Avatar View: Side by side places the two avatars next to each other. Overlay displays them in the same position so you can compare their body shapes.
Avatar Spacing: Adjusts the distance between the avatars in Side by side mode. This is unavailable in Overlay mode.
Source Opacity: Adjusts the opacity of the source avatar.
Target Opacity: Adjusts the opacity of the target avatar.
Show only working objects: Temporarily hides Scene objects that are not part of the current work.
Show Source Clothes: Controls the visibility of the outfit on the source avatar. Available in Side by side mode.
Show Target Clothes: Controls the visibility of the outfit on the target avatar.
Body Shape Matching and preview

Body Shape Matching: Compensates for differences in body shape between the source and target avatars. We recommend enabling it when the avatars have noticeably different breast sizes. Breast Matching is only available while this option is enabled.
Preview: Select On to see an approximate preview of the body shape matching result.
Refresh Body Shape Preview: Updates the preview with your changed settings. This may take a little time.
BlendShape tab
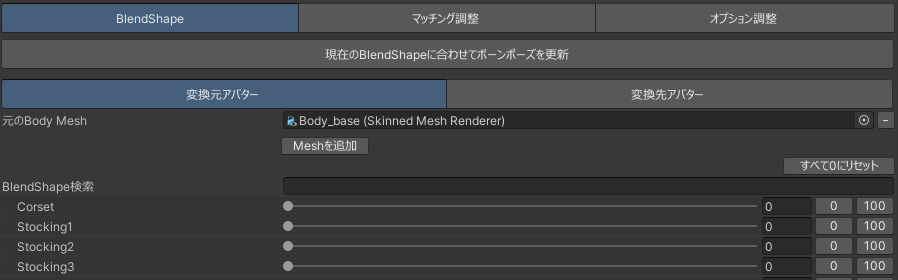
Update Bone Pose for Current BlendShapes: Recalculates the bone matching pose based on the current BlendShape values. We recommend updating it after changing BlendShapes.
Select Source Avatar or Target Avatar, then adjust the BlendShape values in the list using the sliders or numeric fields.
When you adjust a Source Avatar BlendShape, the outfit's BlendShape value is also updated if it has the same name. BlendShapes with different names, or without a matching entry, are not linked.
Source Body Mesh and other body mesh fields: When Automatically Assign Torso Mesh is enabled, these fields show the automatically detected body meshes. You can assign meshes manually if the wrong mesh is selected or the body consists of multiple meshes.
Matching tab
Use this tab to adjust bone and breast reference positions before conversion.
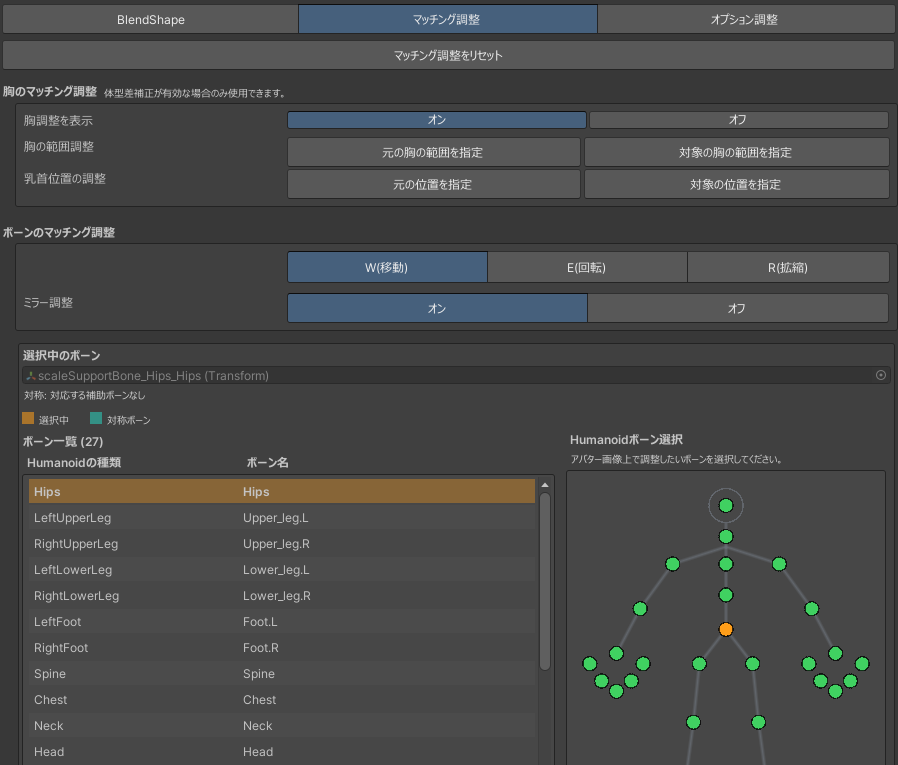
Reset Matching: Returns bone and breast matching adjustments to their initial state.
Breast Matching: Adjusts the reference positions so that the breast regions of the source and target avatars correspond correctly. Adjust these positions if the automatically detected positions do not match the avatar's actual shape.
Note: This is only available when Body Shape Matching at the top of the editor is enabled.
Breast Guides: Select On to display the breast guide planes and reference points.
Breast Region: In the Scene view, move the Y axis of the movement gizmo at the center of each guide plane to align it with the upper or lower edge of the breast region.
Note: Match the guide planes to each avatar's actual breast positions, rather than placing both avatars' guides at the same height.
Nipple Adjustment: Drag with the mouse to mark the most protruding point on the front of each breast on the body mesh. Press Esc to cancel. These points define where the most protruding parts of the breasts should correspond.
Bone Matching
W(Move): Adjusts the position of the selected bone.
E(Rotate): Adjusts the rotation of the selected bone.
R(Scale): Adjusts the scale of the selected bone.
Mirror: Select On to adjust the corresponding bone on the opposite side at the same time. Select Off to adjust only one side.Options tab
Adjust the basic and advanced fitting options to store in the preset.
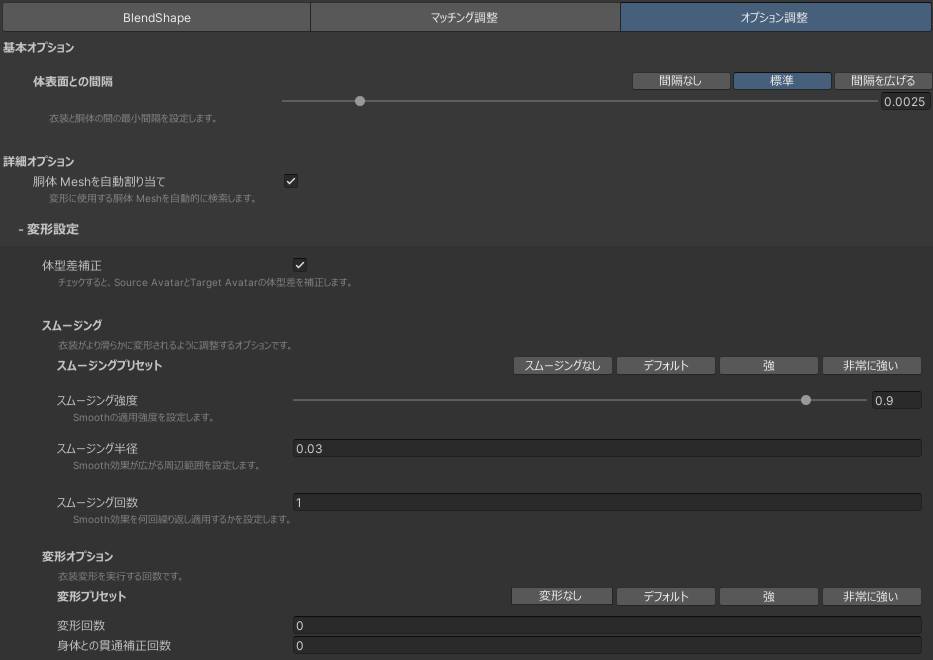
Body Gap: Sets the minimum gap between the outfit and the avatar's body.
Automatically Assign Torso Mesh: Automatically finds the avatar's body mesh. Disable this option to assign body meshes manually.
Body Shape Matching: Compensates for differences in body shape between the source and target avatars. This is linked to the same option at the top of the editor.
Smooth: Adjusts how strongly smoothing is applied to the deformation.
Fitting Settings: Adjusts Fitting Iteration and Body Penetration Correction Iterations.
Note: See Parameter Description for the basic concepts behind these options.
Click Save in the editor to open the save window.
Check the following fields and edit the names if needed.
Field What to enter Preset Name A name that will help you identify the preset later Source Avatar Name A name that identifies the source avatar Target Avatar Name A name that identifies the target avatar Click Save, then confirm in the confirmation dialog.
When the save completion message appears, you return to Kisetter with the saved preset automatically selected.
To fit the outfit using these settings, click Dress Avatar.
Finish or cancel editing#
Click Return to Kisetter to go back to the previous screen. If you have unsaved changes, choose one of the following:
- Save and Return: Check the names in the save window and save the preset.
- Return Without Saving: Discard the changes from this editing session and return.
- Continue Editing: Return to the editor and keep adjusting.
5. Restore the state before applying a preset#
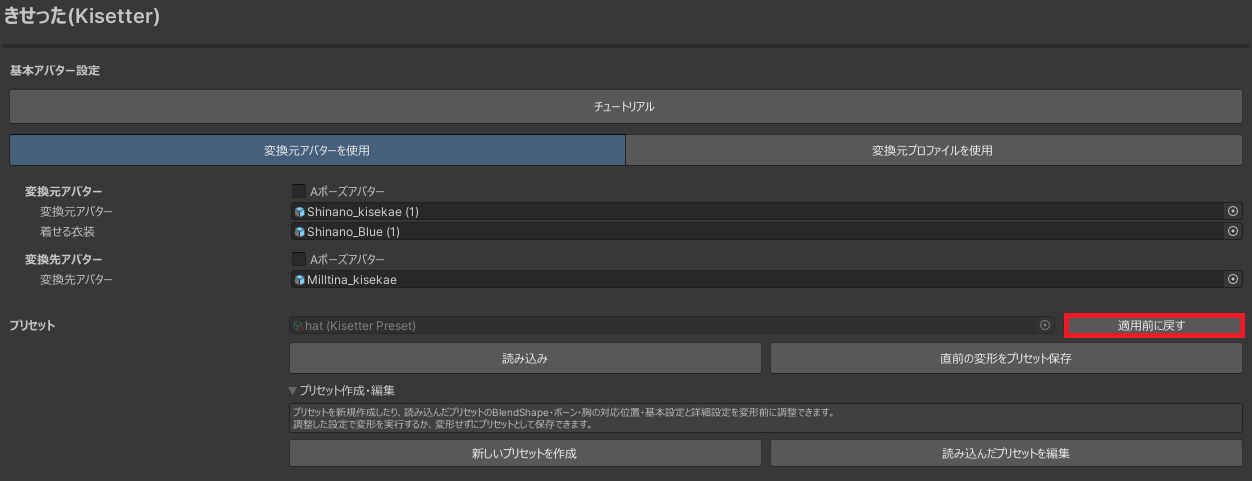
If a loaded preset does not suit your needs, click Restore Previous. This restores the settings and BlendShape values from immediately before the last preset was applied and clears the preset selection.
This is available only while the source avatar or profile, outfit, and target avatar are the same as when you applied the preset. You cannot restore the previous state after changing the avatar and outfit combination.
This does not delete the preset file or undo all previously generated conversion results.
6. What presets save and important notes#
| Category | Contents |
|---|---|
| Saved adjustments | Avatar body mesh BlendShape values; avatar bone position, rotation, and scale adjustments; breast reference positions; and supported fitting options |
| Not included | Adjustments to the outfit itself; the actual avatar and outfit objects in the Scene; and finished outfit Prefabs or Mesh files |
A preset does not store every Kisetter setting or your complete work results. Save or export the resulting files separately using the usual tools.
7. Unavailable buttons or missing presets#
- Load or Create New Preset is unavailable: Check that the source avatar (or source profile), outfit, and target avatar are all assigned. Exit Unity's Play mode and finish any conversion, preset editing, or saving currently in progress.
- Edit Loaded Preset is unavailable: First, click Load, select a preset, and click Apply.
- Save Last Conversion as Preset is unavailable: Check that you have completed a full conversion with Dress Avatar in the current session. If you worked step by step, you must finish Weighting. The source and target avatars must be the same as when the conversion completed. If you already saved that conversion as a preset, complete another conversion to enable the button again.
- A preset does not appear in the list: Check that its
.assetfile is underAssets/@Eden_Tools/Kisetter/Presets, then click Refresh. Also check whether the Source Avatar / Target Avatar filters are excluding it. - A message says the preset cannot be applied: Check that the selected preset and outfit are compatible with the current source avatar. Renaming an avatar does not make a preset with an incompatible bone structure usable.
8. Export presets#
Use Export Package to share presets you have made or transfer them to another Unity project.
Presets are saved in the
Assets/@Eden_Tools/Kisetter/Presetsfolder.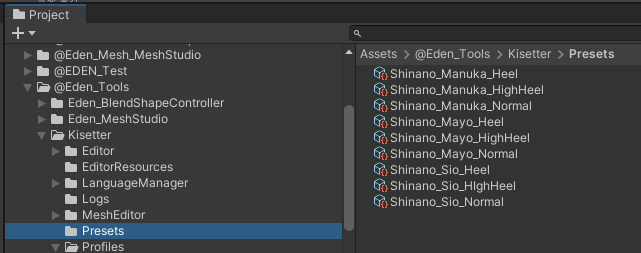
Select the presets you want to export. You can select multiple presets and export them together.
Right-click the selected presets and choose Export Package....
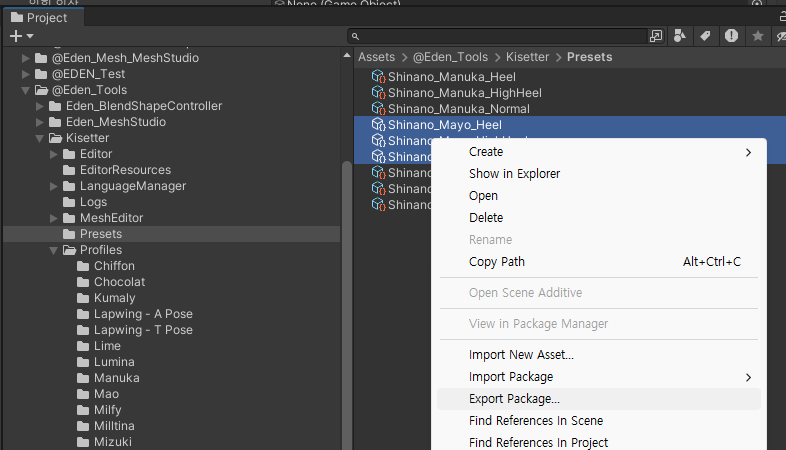
Check the files to include in the export window, click Export..., then choose a file name and save location.
Share the saved
.unitypackagefile.
9. Add presets#
To add a preset you received, place it in your Unity project's Assets/@Eden_Tools/Kisetter/Presets folder. Use the folder shown above.
- If you received a
.unitypackagefile: With the Unity project you want to use open, double-click the file and click Import. Check that the imported presets are under the folder above. - If you received a preset
.assetfile: Open theAssets/@Eden_Tools/Kisetter/Presetsfolder and move the.assetfile there.
After adding the files, open Preset → Load in Kisetter and click Refresh. Choose the avatar combination in the Source Avatar / Target Avatar filters, select the preset, and click Apply. For the detailed steps, see Load a preset.
When you are ready, return to the Automatic Outfit Fitting Guide to check your options and run the conversion.